I have a confession to make. I have a new site. Don't worry! It's still Buttercup Blessings, I just won't be with blogger anymore. So, mybuttercupblessings.blogspot.com is no more. Or, at least it will be after a month or so. I will not be writing any new blog posts on this site. It will all be on ButtercupBlessings.com. I wanted to go all-in with blogging. I have been blogging for a while now, breaks in between and such. I have recently purchased a Nikon D5300 and let me tell you, it has opened my eyes to photography! It has also brought my blog new life. I can tell a better story with better pictures. I love looking at pretty pictures. To get your blog on the right foot, it is best (in my opinion) to get your blog on a self-hosted site. Wordpress.org here I come! So... long story short, go to ButtercupBlessings.com for further blog posts, pictures, and crazy antics from myself. Hehe.
See y'all over yonder!
Dannielle

Apr 13, 2015


Apr 2, 2015
Easter Eggs 3 Ways
We all loved dying Easter eggs when we were little, we love it now with our littles. After you've done them the same way year after year, after year, you want to do something different. I tried to find ones that I already had the ingredients for.
To make the dyes, you will need food coloring, vinegar and boiling water. How ever many different color dyes you want is how many cups you will need. Put about a cup of boiling water in to each cup. Pour 2 teaspoons of vinegar in each cup. Put drops of food coloring into each cup. Here are some color combinations that you may like.
Melted Crayon Easter Eggs

Follow my blog with Bloglovin After you dye each egg, with a lighter, melt a crayon and let it drip on the egg. You can use as many colors as you want. We liked this one best. Of course don't let the littles mess with fire, but they can hold the crayon.
Sharpie Alcohol Easter Eggs

This looked really easy and fun to make. It was, but it did not turn out like the pictures. Don't ya just hate that?! The messier the drawing on the eggs the better. Leave no white of egg left. Take a medicine dropper and drop alcohol onto the eggs. It should smear the colors, leaving a tie-dye look. We weren't as successful as the eggs I saw, but it's the effort that counts, right?!
Metallic Painted Easter Eggs

These are my favorite Easter Eggs artistic wise. I love simple, pretty things. These eggs are it. Metallic paint pens are what you will need. Dye the eggs accordingly, and let them dry. Draw onto the eggs whatever design you'd like. Let the pain dry and and go over the designs again to deepen the metallic color.
I hope y'all enjoy dying these eggs. It sure was fun for us.
Happy Easter! Remember the reason for the season. Luke 24:6-7
Dannielle
To make the dyes, you will need food coloring, vinegar and boiling water. How ever many different color dyes you want is how many cups you will need. Put about a cup of boiling water in to each cup. Pour 2 teaspoons of vinegar in each cup. Put drops of food coloring into each cup. Here are some color combinations that you may like.
Melted Crayon Easter Eggs
Follow my blog with Bloglovin After you dye each egg, with a lighter, melt a crayon and let it drip on the egg. You can use as many colors as you want. We liked this one best. Of course don't let the littles mess with fire, but they can hold the crayon.
Sharpie Alcohol Easter Eggs
This looked really easy and fun to make. It was, but it did not turn out like the pictures. Don't ya just hate that?! The messier the drawing on the eggs the better. Leave no white of egg left. Take a medicine dropper and drop alcohol onto the eggs. It should smear the colors, leaving a tie-dye look. We weren't as successful as the eggs I saw, but it's the effort that counts, right?!
Metallic Painted Easter Eggs
These are my favorite Easter Eggs artistic wise. I love simple, pretty things. These eggs are it. Metallic paint pens are what you will need. Dye the eggs accordingly, and let them dry. Draw onto the eggs whatever design you'd like. Let the pain dry and and go over the designs again to deepen the metallic color.
I hope y'all enjoy dying these eggs. It sure was fun for us.
Happy Easter! Remember the reason for the season. Luke 24:6-7
Dannielle
Apr 1, 2015
Easter Treats!
Hey y'all! I thought I would show you some ideas for treats I did for this Easter. I wanted to do them early enough so that you could get the ingredients and make them yourself without having a "moment." Us moms are ensured to have those every now and again, so I try to keep them at a minimum. Ha.
In this post I've got some White Chocolate Covered Strawberries, Red Velvet Bon Bons, and Marshmallow Goodies. Mmmmm.
First up, White Chocolate Covered Strawberries

These are pretty simple. I'm sure you've made them yourself once. If not, never fear!
Ingredients needed:

These take a little more effort, but are worth it all!

2. After cooking, put the cake into a big mixing bowl and break up the cake with a fork. Let cool.
3. Spoon the cream cheese icing into the cake and stir until combined.


These are so stinkin easy! And they are pretty! My kids loved them.

In this post I've got some White Chocolate Covered Strawberries, Red Velvet Bon Bons, and Marshmallow Goodies. Mmmmm.
First up, White Chocolate Covered Strawberries
These are pretty simple. I'm sure you've made them yourself once. If not, never fear!
Ingredients needed:
- Vanilla almond bark
- Food coloring
- 1 or 2 sandwich baggies
- Strawberries
- Baking sheet with a baking mat or parchment paper
Steps:
- Rinse strawberries in colander. Lay them out on a kitchen towel to dry.
- Put 1/2 of the almond bark into a microwave-safe bowl and nuke them at 15 second intervals until the chocolate is melted.
- If you are using 2 colors in all then take a heaping spoonful of melted chocolate and put it into the other bowl. If you are using 3 colors in all repeat with another bowl as well.
- Drop whatever color food coloring in each bowl you want to use into the chocolate. A little goes a long way. Only a drop or two will do.
- Dip dry strawberries into the first bowl, hold the green leaves, and twist each strawberry in the chocolate until it is mostly covered.
- Put onto baking sheet/ parchment paper.
- Continue until all strawberries are covered. If you need more chocolate then use another bowl to microwave it and pour into bowl/s that are running low.
- Take the other colors and put each into a sandwich baggy with a spoon.
- Cut the sandwich baggy at the tip where the chocolate will come out. The tinier the cut the smaller the string of chocolate.
- Once you are done decorating them time to put them in the fridge for about 10 minutes.
Red Velvet Bon Bons
These take a little more effort, but are worth it all!
Ingredients needed:
- Red velvet cake mix (ingredients to make the box cake as well)
- Tub of cream cheese icing
- Small ice cream scooper or a tablespoon measure
- Chocolate almond bark
- Baking mat/ parchment paper on baking sheet
- Sprinkles
Steps:
- Bake the cake according to the directions.
3. Spoon the cream cheese icing into the cake and stir until combined.
4. Use the ice cream scooper or tablespoon measurer scoop out the cake mixture and roll it into a ball. Put it on the baking sheet. This part was extremely messy. Melt 1/2 of the almond bark in a microwave-safe bowl at 15 sec. increments until creamy.
5. Drop one cake ball in and use a fork to cover it with chocolate.
6. Scoop up the cake ball with the fork and tap it against the side of the bowl. This will remove excess chocolate.
7. Use a toothpick to help guide the Bon Bon off of the fork and onto the baking sheet.
8. After three are done I sprinkle them with different sprinkles. If you do too many before you sprinkle, the chocolate will be hardened. No bueno!
9. After you have completed all Bon Bons they need to go in the refrigerator for at least 10 minutes. They taste great then, but the longer they are in the fridge the better they are. Trust me! I am an official Bon Bon taster...
6. Scoop up the cake ball with the fork and tap it against the side of the bowl. This will remove excess chocolate.
7. Use a toothpick to help guide the Bon Bon off of the fork and onto the baking sheet.
8. After three are done I sprinkle them with different sprinkles. If you do too many before you sprinkle, the chocolate will be hardened. No bueno!
9. After you have completed all Bon Bons they need to go in the refrigerator for at least 10 minutes. They taste great then, but the longer they are in the fridge the better they are. Trust me! I am an official Bon Bon taster...
Marshmallow Goodies
These are so stinkin easy! And they are pretty! My kids loved them.
Ingredients needed:
- Medium sized marshallows
- Pastel colored glitter
- Chocolate almond bark
- Sandwich baggy
Steps:
- Using a knife, cut the ends of the marshmallow.
- Dip each end into sugar.
- Melt 2 blocks of almond bark in a microwave-safe bowl at 15 sec. increments until melted.
- Put chocolate into baggy and cut a tiny hole at the tip
- Poke a toothpick into the end of the marshmallow.
- While holding the toothpick, you can now pipe the chocolate on the the sides of the marshmallow.
- Put them into the fridge for just a minute to harden the chocolate.
These are all treats that are fun for the kids to help make. And eat! It is not just a moment that you are making something for a party or a special meal. You are making memories with your kids, and believe me they will remember!
Enjoy!
Dannielle
Mar 30, 2015
7 Reasons Why I Love Homeschool

It's been almost a full year since I have started homeschooling. It's been over a year since I wanted to homeschool. Yes, I still have days where I want to pull my hair out. Ha! But more often then not, I have days that are great.
I recently started thinking about how homeschooling was whenI first started with Aiden and now. I remember mine and Aiden's frustration and my lack of patience. Now, my patience has grown (thank the Lord) and Aiden and I have come into an understanding of each other's role when "school" starts.
These are the 7 reasons why I love homeschool:
- I love my kids, no one will do more right by them than me.
- I can delve further into a subject because one of my children are interested in it more. I take Aiden to a science center just about every week for him to go to a class and learn all things science with other homeschool kids.
- We can do school work in the car, outside, at the park ...ANYWHERE! That freedom is liberating.
- If we need a break, we TAKE it.
- No more meaningless school days. Everyday we accomplish something or build upon what we have been working on.
- I am closer to my children. I am soaking up this time with them, because I know it won't last forever.
- Our family as a unit has grown closer. When my husband is home he gets to be with them all of the time, so his time home is better. Our family is better.

Today, for instance, Aiden wanted to do his school in his room. As long as he was of good attitude and getting his work done, I was all for it.

This is Aiden catching me taking a picture of him. Haha. I love that boy.
So, there you have it. These are my top seven reasons why I love homeschooling my children. They might change. Ask me in another year... Hehe.
Have a great one,
D
Mar 28, 2015
Planting a Home Garden Pt. 2
Okay, so after you have tested your soil, figured out what seeds you want to sow, and where you are going to sow them the next part is to dig!


There are nice fancy tillers, just your run o' the mill tillers, and a shovel. Because I'm going the low budget route, my choice was a shovel.


Now get to planting! Good luck and don't forget to water... ;) By watering, I don't mean drowning them like I did the first time I used a soaker hose. Ugh...
I used an extra spray paint can that I had laying around the house to mark where I would start each row. You can make your rows as wide or as thin as you'd like. One to three feet is a good choice. You would have already figured this stuff out with the garden plan that you drew up. Once you loosen the ground with the shovel, get the grass and roots out. If you leave the roots guess what you'll have... more grass. Ugh! You don't want anything to deprive your precious plants from getting what they need.
After you have turned up your soil, you'll want to mix in compost. The ideal time to mix in compost is in the fall before spring. That way your soil has a chance to give it's best when springtime comes and you are growing your little seedlings. But... better late than never. I used composted cow manure, but there are plenty of compost options to choose from.
Once the garden is ready to be planted, you'll want to make sure you plant your seeds or seedlings when you are supposed to. 'Round here in Florida, the last hard frost is in March usually. Most plants will be planted after this time. You can go to this site to find out what your last hard frost date it. A few but not the only exceptions to this will be carrots, spinach, onions, and parsley. These are frost hardy not frost proof.
Items you will need for planting:
- Garden trowel - to dig the bigger holes
- 18" Ruler - you will need this to determine just how far away to plant each seed/seedling
- Pencil - you will use the eraser part to make small holes for the seeds
- Garden gloves - unless you want your fingernails to look horrid
- Tray - half sheet baking trays work great, this is for all your small supplies to carry at one time
Now get to planting! Good luck and don't forget to water... ;) By watering, I don't mean drowning them like I did the first time I used a soaker hose. Ugh...
Happy gardening,
D
Mar 8, 2015
Planting a Home Garden Pt. 1

Two years ago, my husband made a 4x10 foot raised garden bed. It worked well, but I figured out quickly that I have to listen to the planting instructions. If it says plant 2 feet apart, I better do it! The first year my garden was over crowded which is not good for producing edible yummy things.
 |
| Courtesy of Flickr by Drewsviews |
My tomato plants were decimated by leaf-footed bugs! The worst! Not knowing what they were, I didn't realize that they would destroy my tomatoes. I looked at them and thought, Oh they are just hanging out. How weird! The next time I looked at those tomatoes they had small holes in them and the innards were turned to mush! In a violent rage I raced and unleashed Sevin Dust on them. It was a war between the Leaf-Footed Bugs and me. I won...
 |
| Courtesy of Flickr by Macroscopic Solutions |
Last year I put my tomato plants in containers away from the raised garden that I used the year before. They did much better. No Leaf-Footed Bugs. But here comes the God awful Tomato Hornworms! You have got to be vigilant about sighting them and quickly removing them from your plant. They have one healthy appetite! I read the best way to get rid of them is to just remove them from the plant. I put them into the woods behind my house. Worked for me.
Besides those pests, I really didn't run into a ton of problems with the small raised garden that I had started. I just realized however, that my unfruitful strawberry plant that I planted last year should produce fruit this year. Did you know it takes a year? Not me. Wish I knew that then. I also have a thornless blackberry bush that I planted two years ago that has not produced a bit of juicy blackberries! I have to look into that. Put it on the list. Ok, so, besides ALL of that I really didn't have any problems (I think I'm having Deja vu). This year however, I am taking a larger and more planned out approach than ever before. BEWARE.
When you first start planning your garden area. First things first, know where the sun is at all times. You must be a sun watcher for a week. Why a week you might ask? Well, if you're anything like me you will make a note or reminder to yourself to go and take pictures of pre-garden area about 6:30 am. Then you do. Done. Now you need to go at 7:30 and every hour until you know where the sun shines at all times. You don't want to start a garden on a whim and then it not work out because of careless planning. But life gets in the way, so you forget to go at 7:30. You remember again at lunch and set an alarm to remind you at 1:30... You get the point. I had planned on putting the garden by the raised garden bed until I realized that the sun only shines for half of a day there.


Here you can see two sets of pictures that I took of my backyard. I really didn't realize that most of my backyard is shaded until NOW! I used a photo editing app on my phone to arrange the pictures and add the times as well.
Once you figure out where you are going to plant, now you can figure out what to plant! This is the fun part. I'm sure you probably did this at first, and to be honest I did too. Hehe. Things to think about: What fruits and vegetables are your favorites? What do you use the most while cooking? You don't want to have a bunch of tomato plants if you don't really like tomatoes. You can go to your closest garden center and find seed packets there, but there are also great ones online. Here are a few sites that I have used or looked into.
The next step in planning your home garden would be to test your soil. This is not a must, but if you want the most bang for your buck this is the best decision.
My soil didn't really need any changes. I have sandy/loam soil. It's about 7.0 pH. I will add some compost to it after I have dug the rows. Must compost! Must compost! It adds beneficial microbes the soil which is good in starving disease and growing tasty fruits and veggies.
Here is my planned garden. It's a messy little mess, and if I realized that I would be putting this on my blog I would have made it prettier. (Ha) A ruler, and pencil with eraser are a must. Once you figure out where you will put your garden, you can start drawing it out. You will erase, you may say expletives, you will definitely be glad when it is over. It is a good idea to put all fruits and veggie info down in one place so that you don't have to go back over and over to your seed packets or online to see how far apart you need to plant them. Because let me tell you it matters!
Here are a few sites that I like for seeds. Or you can just go to your local garden center.
Part 2 is the dirty part. Get your shovel, tiller, ground-turner-upper!
Happy Sunday y'all!
Dannielle
Mar 2, 2015
Hello March
 |
| Courtesy of julochka
Hello March!
Wow, it's been a while since I've been here. I have been busy like no other. I have overwhelmed like no other. I am learning to take one task at a time, rather than doing a bunch of things at once. Ugh! I am a work in progress, what can I say? But aren't we all? Right when I think, oh I've got this figured out Murphy's Law comes around to show me I don't (insert angry red devil emoticon).
On another note, spring is right around the corner. I am super stoked! This year I am doing a full garden. It has taken a quite of bit of preparation. I am starting most plants from seeds. It's cheaper and fun as well for the kids to see the progress and mother nature as she works! I will put another blog post about it soon with pictures!
I know that January 1st is usually the day to begin reflecting and making plan of the new year. I have been out of sorts since November! Or at least it feels that way. The holidays whooped my butt this past year. Aiden's birthday is at the end of January so, January was still busy as crap. A few things I have learned:
I am however out of physical therapy now! That is a very good thing. I am still working on my knee exercises on a daily basis, because my knee isn't fully recovered just yet. I look at it like motivation. I have got to do these exercises to keep my knee strong. Flab be gone!
Homeschooling Aiden has become easier. We still have our days when I want to pull out my hair but, mostly the days are sunny (figuratively) and productive.
Ava's terrible twos is in full force! HELP!!!!!
Say a little prayer for me ;)
Dannielle
|
Nov 24, 2014
Gift List #3
Here's list #3! These are gifts that are different, or not so different, but neat altogether. If you haven't done so already check out list #1 and #2.


This is the Specialty Gift Box from Lucero. This has just about a little of everything they offer. Balsamic vinegar, olive oil, dipping oil, and a lemon artichoke tapenade. I bought my Dad the award winning olive oil and the dipping oil for his birthday this past year. He loved it! I make homemade french bread to go with it, and it is DIVINE! This company has tasting rooms in Portland, OR and California. So, if you're close by give 'em a try! They have many other options, but this is my favorite assortment. $65
These my friends, are Baby Proof books. We all know babies and books are not a great combination. At least if you want to keep your books till the next generation. Plus, these nursery rhymes are classics, and now a days the classics are flying out the window. Perfect price for these six gems! $25
These are absolutely adorable. Ava loves these Finger Puppet Board Book Series! There are plenty of different kinds of animal books as well. They range from $4 to $7.
I like classic pieces for the most part. But I also think every woman needs statement jewelry. Francesca's has so many delightful pieces that could dress up any outfit. These Barbados Circle Chandelier earrings are dressy but simple and totally cute! And for $22 you can't beat it with a stick!
Have a great Thanksgiving week!
Dannielle
Nov 11, 2014
Thankful Pumpkin
For the month of November, we are doing Thanksgiving, thankful, and turkey crafts. This week we did a Thankful Pumpkin. I'm gonna break it down for ya... ;)
What you will need:
2 or 3 orange sheets of construction paper
1 sheet of green construction paper
black washable marker
tape
scissors

Ok, besides this table being scratched to heck and back, see the tape hanging off of it? Be prepared to have plenty of tape on hand in this matter.
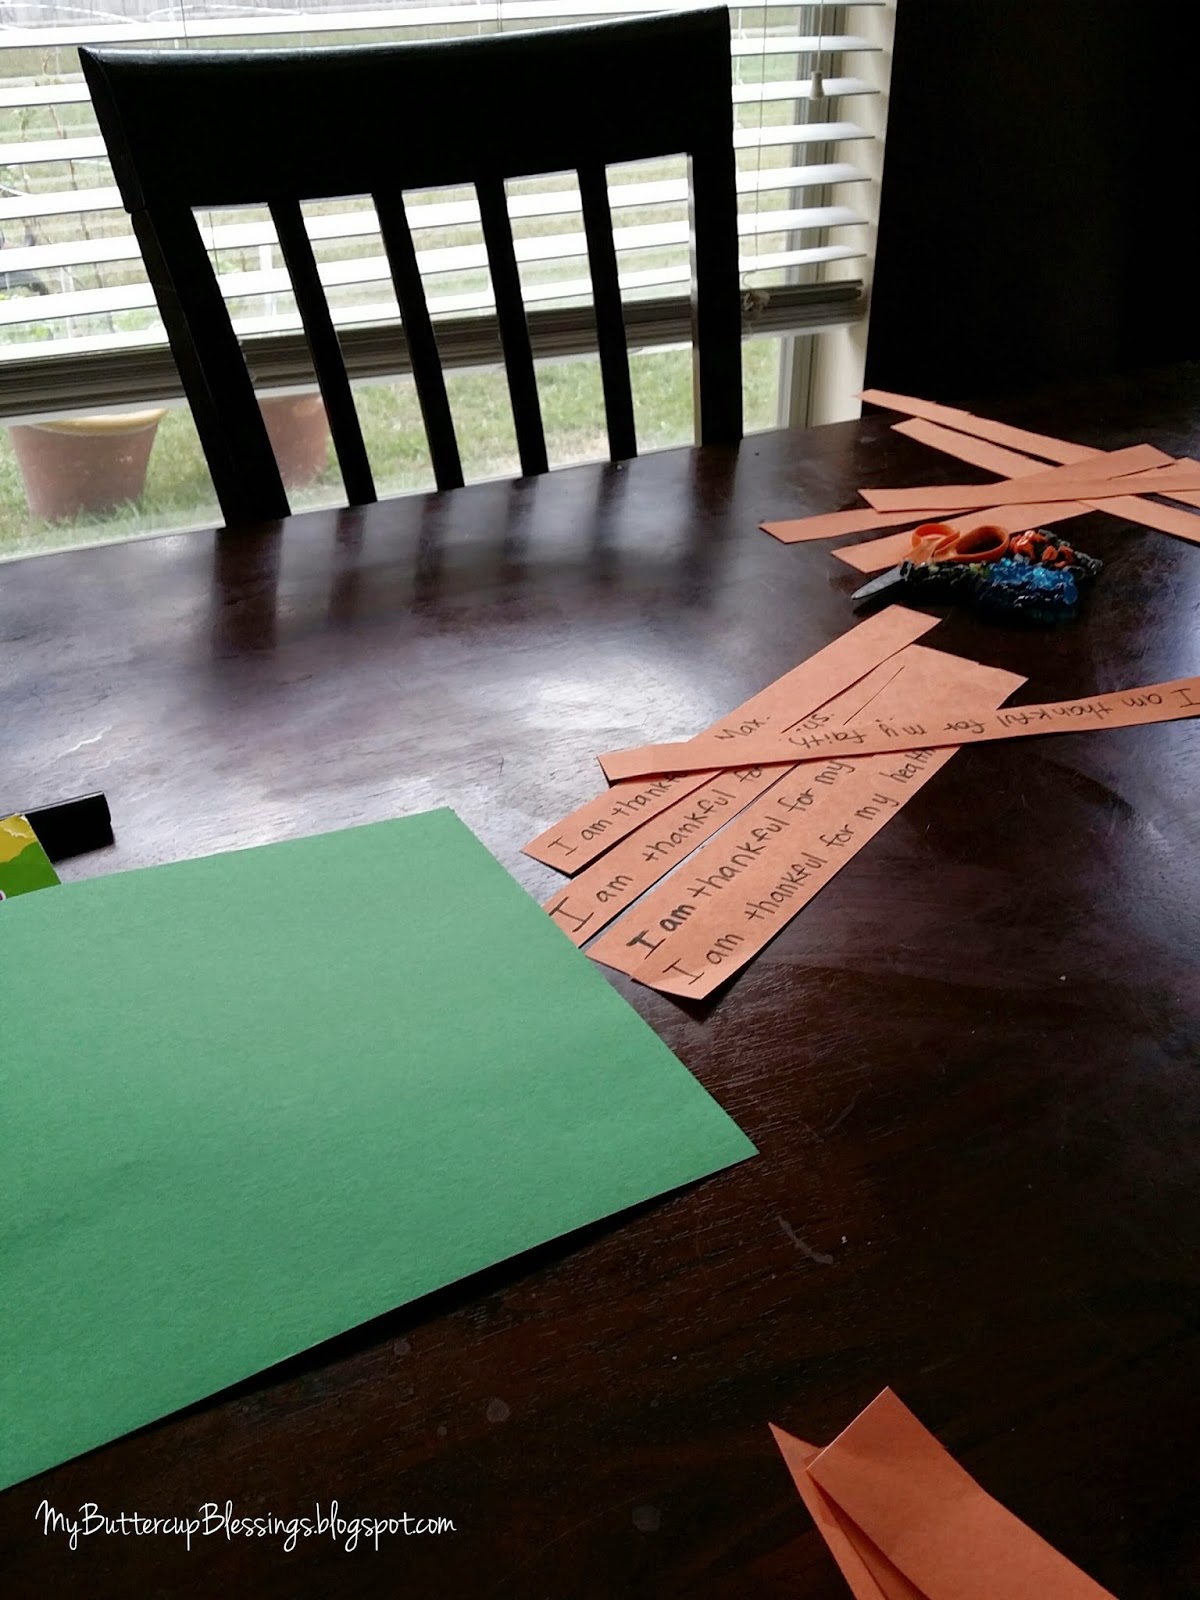
Cut the orange paper into strips (lengthwise). About 1 to 1 1/2 inches long. Start writing "I am thankful for..." and then put what you are thankful for. This was an opportune time to talk about what we are grateful for. I mentioned to Aiden that no matter what we can always be thankful for something. Make sure that your character is free from the love of money, being content with what you have; for He Himself has said, "I will never desert you, nor will I ever forsake you," Hebrews 13:5

Aiden with his thinking cap on...

I wouldn't give Ava scissors, and she is getting at the age where she had got to do whatever Aiden is doing. Here she is practicing with a crayon. That lasted to about 3 mins. He he.

Okay, here goes... you want the thankful statement to be on the outside. So, you take two strips and put them in a "V." The wideness of the "V" will determine how many strips you will use. As you can see in the next photo, Aiden's "V" was wider.

Here's the final project! It turned out better than I thought. Mine was starting to fall over to the side so I put an apple in the middle to keep it straight. Aiden's however, is sitting just right. For the vine and leaf, I just freehanded two spirals and two leaves. Cut them out and tape the vine onto each pumpkin. After you have cut out the leaves, roll each one up for just a minute. It makes it look more realistic.
This was such a great crafting experience for me. Aiden enjoyed it too, but it was nice for me to communicate with him about being thankful.
A+ for great family fun!
I hope y'all enjoy!
Dannielle
Nov 10, 2014
Gift List #2
If you haven't seen the first list, check this out.



See, I always have a hard time finding cute, fun, enjoyable gifts that my family and friends will like. Yes, it's always easier when they know exactly what they want, but that doesn't seem to happen to me unless they are 15 and under.
Each week until Christmas I will post a list of gifts and where to get them.
These are soft slippers from H&M. These are perfect for young boys. Aiden would love these! Winter is always the best time to have slippers, and these are super fun and comfy looking too. $12.95
Ok, first of all, let me just say I love Anthropologie. Their style is just my style. We have the same style, you know what I mean?
Here is the Polka Pleats Apron. I think it is beautiful. If you cook or know someone who does, y'all need this. They also have it in black and red. $32
This is a total dude gift. How do I know this, you may ask? My husband found it and said he wanted one. It's a Power All. Its name is completely fitting. It powers all. Well, let's just say it powers all small things and some big things, like a vehicle. Great to have for a man, or a young driver, or heck just any driver. I rescind my previous statement. Everyone needs this. Ha. $100
If your child is anything like mine, they would love this. This has some serious learning opportunities and fun for the family. This is definitely on my Christmas list for Aiden this year. I know he will just love it. $12.95
Until next time,
Dannielle
Nov 6, 2014
What Do You See?
As a kid, did you ever look up at the clouds and see shapes such as dinosaurs, or dragons walking across the sky? I did. I still do, but not with just clouds. For some reason whether its the ceiling, tile floor, or plywood if I stare at it long enough I can see a picture unfolding. I call it imagination or crazy. I can't figure out which.

This is my ceiling. For some reason it screams the wild west. Ha. I guess it could be anything. I see a small buffalo on the edge of a cliff as if he's about to make a big jump to the cliff in front of him. I see horse-like figures rearing up all over as if it is a big wild western war.
What do you see? Besides me being certifiable. Ha.
Maybe I should have drank more coffee ~ Dannielle
Nov 4, 2014
An Apple A Day
 |
| Courtesy of www.flazingo.com |
Apples are absolutely amazing! Wow, now that was an alliteration. We've all hear the saying, "An apple a day keeps the doctor away." While it is fun to say, it is however, not really true. Gosh, how I wish it was.
I was on my way to physical therapy yesterday, and like most mornings I drank coffee, and like most mornings, I forgot to eat. Now, I don't mean I forgot to eat like all day till lunch. God no! I love food. But coffee suppresses my appetite, so for about an hour or so after I drink it I am not hungry. I guess I should eat before I drink coffee, but who does that?! Ha.
As I am getting the kids ready I remember that I need to take ibuprofen before my appointment, so it can do its job during and afterwards. Then, I remember I didn't eat... Ugh. I don't have time for food at this moment! I quickly grab an apple and some dry roasted peanuts. After I drop the kids off and drive on my way to therapy, I start on the apple. I start thinking about all the good things about apples. I then proceed to take a selfie of me eating an apple. Please forgive me....

I promise I am not angry, and I promise I am laughing at myself right now. I hate taking pictures of myself. Period.
Apples act like a toothbrush. If you're going to eat one, eat it after a meal.
As you get older, you realize that fiber is your friend. An apple has about 4 to 5 grams of fiber in it. Make sure you eat it with the skin!
Physicians say a high fiber diet reduces the risk of diabetes, heart disease, and obesity. An apple is just a piece in that puzzle.
My kids love apples! Aiden especially loves them with peanut butter. I also love them with cheese. Cheese makes everything better!
There a tons of other benefits to eating apples. Too many to mention. Click here for some more benefits. These are my favorites. Plus, I'm not trying to write an informational essay of the benefits of apples. I'm done with papers. Unless, I go back to college. Which I might. One day.
Grab an apple and feel good for yourself!
I'm an apple eatin' fool!
D
Nov 1, 2014
Hello November
 |
| Courtesy of James Wheeler |
By failing to prepare, you are preparing to fail. With each new month comes new tasks. I always have the best of intentions to get ahead and start things before they HAVE to be done. But to be honest, it doesn't happen as I have planned. So, with that being said, here is a way for us to keep each other accountable! We can do it!
First of all, there are 54 days until Christmas! I love Christmas. I LOVE Christmas. Have I told you I loooooove Christmas? This is the time if you haven't already to get your shopping list together. I mean who, how much, and what kinda stuff. Budgeting isn't fun, but it is a great way to purpose your money. You will know how much you are going to spend and you wont have to freak out December 26th.
Since this is the month of Thanksgiving, you might be doing a lot of cooking. This is a good reminder to check your fire alarm batteries. Test your fire alarm and CO2 monitor! If you're not cooking, be thankful, and test your fire alarm and CO2 monitor!
Our lease renews every December, so I have gotten in the habit of wiping walls and baseboards twice a year. Once, now before the rental management company comes and takes a look at the house to make sure my munchkins haven't destroyed it. The second is six months from now. Magic Eraser gets the job done and done quickly!
Holiday Cards! I do not get my photos professionally done. I love photography, so this is a way I can use my creative streak. Nothing against professionals! Start thinking how, where, what time of day, outfits for the family, and when. You can use Shutterfly or tinyprints. This of course takes more time and effort, but the result is something that is original and ALL yours. You can't beat that with a stick. You just can't.
Happy November y'all!
Dannielle
Oct 30, 2014
Little Girl All Grown Up

These button down pjs are absolutely precious! When I showed her her new pjs, she said, "Awwwe!" She was excited to put them on knowing that they were different. She ran to the mirror and twisted her torso back and forth staring at herself in the mirror. I had never seen her react that way to clothes. She's definitely all girl.

In my family, for Christmas Eve, we open one gift. They are pajamas. We usually let the kids open a toy gift as well. I will have the Christmas pajama set for her to wear Christmas Eve.

I got these at Target. I mean Target is my all-time go-to place for just about everything. If I can't find it there I go to Amazon. I literally don't have any shopping in my town. I have to drive forty-five minutes. Ugh! But... I love the country.

These are super cute as well! There are other choices in the Target link that I posted up top, but these are my faves.
Do y'all have any pajama's that y'all love for your little munchkins?
Happy Halloween Eve!
Dannielle
Subscribe to:
Posts (Atom)